Showing posts with label WINDOWS 7. Show all posts
Showing posts with label WINDOWS 7. Show all posts
Sunday, February 14, 2010
Windows XP Mode for Windows 7 hits RTM
Microsoft today announced that the code for Windows XP Mode has been finalized and the company is now preparing to release it in exactly three weeks. "Thanks to everyone's feedback, we're happy to announce that Windows XP Mode has RTM'd today," according to the Windows 7 Team Blog. "We expect to make the final release of Windows XP Mode available via the Microsoft Download Center on October 22nd. OEMs will be able to offer Windows XP Mode on their PCs based on their manufacturing schedules."
Windows XP Mode is aimed at small and mid-sized businesses that are migrating to Windows 7 Professional, Windows 7 Ultimate, or Windows 7 Enterprise and that need the ability to run Windows XP productivity applications which are incompatible with Vista's successor. While Microsoft insists that many Windows XP applications will be compatible Windows 7, or at least every one that is compatible with Vista, the company says Windows XP Mode can be used as a last resort for those that are not.
Microsoft first announced Windows XP Mode and released a beta in April 2007. The company explained that users had to install the old applications directly in Windows XP Mode, which is a virtual Windows XP environment running under Windows Virtual PC. Once that is done, the applications become available on the Windows 7 desktop and can be run directly from Windows 7.
In May 2009 it became clear that Microsoft and Intel had contrived to make XP Mode unavailable to many Intel users. In August 2009, a Release Candidate version was released that brought many improvements to the add-on, including USB and jumplist support as well as a new user tutorial.
How to Start in Safe Mode in Windows 7
How to Start in Safe Mode in Windows 7
Choose a Windows 7 Safe Mode Option
- Safe Mode - This is the default option and is usually the best choice. This mode will load only the absolute minimum processes necessary to start Windows 7.
- Safe Mode with Networking - This option loads the same processes as Safe Mode but also includes those that allow the networking functions in Windows 7 to work. You should choose this option if you think you may need to access the Internet or your local network while troubleshooting in Safe Mode.
- Safe Mode with Command Prompt - This version of Safe Mode also loads a minimum set of processes but will allow immediate access to the Command Prompt. This is a valuable option if more advanced troubleshooting is necessary.
Wait for Windows 7 Files to Load
If Safe Mode freezes here, document the last Windows 7 file being loaded and then search my site or the rest of the Internet for troubleshooting advice. You can also post the problem in the PC Support forum and someone will likely be able to help.
Login With an Administrator Account
Make Necessary Changes in Windows 7 Safe Mode
Friday, February 5, 2010
Setting Up a Wireless Network with Windows 7
Setting Up a Wireless Network with Windows 7
The objective of this article is to set up a simplified home network using a mix of a Vista desktop PC, a laptop running Windows 7 beta, and a laptop running Windows XP. Defining features of this network will be the lack of network passwords for local connections (both wirelessly or wired) and no single “boss” computer. Devices on the network will act as peers – no computer will rely on another computer to be present on the network – in order to reach the Internet, but it won’t be an ad-hoc network. File and folder sharing, of course, will depend on other computers being present, but we’ll look at specifying what folders we’ll share with others and these we will share and share alike.
Router Configurations
The most boss-like object in the network is the wireless router. For our purposes, we’ll presuppose that each computer can connect to the router. In our test network, the Vista desktop computer has the wired connection to the router and was used to set the router up. It’s very important that the router is not left at defaults and is set up properly because the security of the simplified network is based on the router and on having both a strong network password and an encrypted connection. By strong password, we mean a mix of letters and numbers that can’t be guessed or easily “cracked” by brute force. Your router setup program may suggest a pseudo-random password based on the encryption you selected. This is very safe to use. By encryption, we mean Wi-Fi Protected Access, or WPA-PSK. The “PSK” part stands for “pre-shared key,” which is that secure password.
Since setup varies and you’ll need to use the documentation for your router to perform it, we’ll only briefly touch further on this. You want to set it to broadcast your network name or service set identifier (SSID). You’ll want to make sure that each computer on the network can reach the Internet. A somewhat common problem you may encounter is that a PC can connect wirelessly to the router and seems to be passing some data when you view “Status” for the device, but the web browser can’t reach any web pages.
This can mean that the computer was set up by default for wireless networking (with Microsoft networks, of course), but not for Internet access. It is, however, easy to fix.
Instructions for Windows XP
Windows XP: Start → Connect To → Show All Connections. Select the “Wireless Network Connection” by right-clicking it and selecting “Properties.” Under the General tab, in the main window, you’ll see “This connection uses the following items.” Scroll down to see if “Internet Protocol (TCP/IP)” is in the list. If it is not, click the “Install” button and then “Protocol.” You’ll see “Internet Protocol TCP/IP” in the list and can highlight it and click OK to add it. (If you see “Microsoft TCP/IP version 6” in the list, it’s fine to add it as well.) Back in the Properties dialog, scroll down and find “Internet Protocol (TCP/IP)" in the list. Highlight it and then click the “Properties” button. “Obtain an IP address automatically” and “Obtain DNS server address automatically” should both be checked. Click OK to close the dialog, and then, for best results, reboot your PC. When it restarts, connect to the network, and you should able to browse the web.
Vista: Start → Network → Network and Sharing Center (or Start → Control Panel → Network and Sharing Center) → Manage Network Connections. Right click “Wireless Network Connection” and proceed as described above for Windows XP.
Windows 7: Start → Control Panel →View Network Status and Tasks → Change Adapter Settings → Wireless Network Connections. Right-click Properties, and then the steps are the same as in Vista and Windows XP.
In each case, remember to do the same steps (enable automatic IP and DNS) for Internet Protocol version 6 as well before saving and rebooting.
Hopefully, at this point, all the computers will be able to connect to the router and access the Internet. We are ready to start setting up the network.
Hopefully, at this point, all the computers will be able to connect to the router and access the Internet. We are ready to start setting up the network.
Setting Up the Simplified Network
There are only a couple of rules to follow here. The computers on the network must each have unique names and must belong to the same “workgroup.” “WORKGROUP,” in fact, is often the default name assigned by Windows. However, we want to use a more unique group name of our own. This is very useful if you’ve had previous networks running on some of the computers. A different group name tells Windows to release some of its preconceived notions about the network setup, and this is an important part of creating the simplified network.
To change the computer name and group name in Windows XP, right-click “My Computer” and select “Properties.” In the “Computer Name” tab, click the “Change” button. Enter a unique computer name, if the computer does not already have one, and then enter the new workgroup name. When you click OK, Windows will welcome you to the group and advise you to reboot the PC.
To change the computer name and group name in Windows XP, right-click “My Computer” and select “Properties.” In the “Computer Name” tab, click the “Change” button. Enter a unique computer name, if the computer does not already have one, and then enter the new workgroup name. When you click OK, Windows will welcome you to the group and advise you to reboot the PC.
To change the computer name and group name in Vista and Windows 7, right-click “Computer” and select “Properties.” Expand the dialog downward if necessary and find “Computer name:” At far right, click “Change settings.” In the System Properties dialog under “Computer name,” click the “Change” button. Enter your unique computer network name (or keep the old one, as long as it's unique), enter the same group name you used previously, and leave “Domain” blank. Click OK, and Windows will welcome you to the group and ask for a restart.
And that’s it – the basics of setting up our network. At this point, all the computers are in the same workgroup and will recognize each other. Each will be able to connect to the router and surf the net. Each will be able to access already-existing shared and “public” folders on other devices on the network. Now it’s time for some refinements.
And that’s it – the basics of setting up our network. At this point, all the computers are in the same workgroup and will recognize each other. Each will be able to connect to the router and surf the net. Each will be able to access already-existing shared and “public” folders on other devices on the network. Now it’s time for some refinements.
Read more: http://www.brighthub.com/computing/hardware/articles/26291.aspx#ixzz0ejodYVSQ
How To Setup A Wireless Profile On Windows 7
How To Setup A Wireless Profile On Windows 7
on most of Windows versions, the wireless bar is located at the right hand side of the system bar, close to the system clock:
If you click on the wireless bar, the currently available wireless window come up:

click on “Open Network and Sharing Center” that should bring you to the control panel network management utility:

click on “Manage wireless networks” as my nice arrow indicates (:> clicking on that should bring you to the wireless network utility, click on Add:

The manually connect to wireless wizard will come up. click on Manually create a network profile:
Enter the wireless access point on the next window that comes up:

Enter your settings accordingly, and if you wish to, check the “Start this connection automatically” click Next after entering your information. and that should setup the local profile for your wireless on your laptop.
Tuesday, January 19, 2010
Microsoft Windows 7 Home Premium Price

Microsoft Windows 7 Home Premium is now available in India
Windows 7 Home Premium with media center features watch, pause, rewind, and record TV functions and makes it easy to create a simple home network and share all of your photos, videos, and music.
Microsoft Windows 7 Home Premium Features:
- New navigation features like Aero Shake, Jump Lists, and Snap.
- Easily Customize Windows look and feel
- Makes your computer sleep and resume quicker
- 64-bit PC hardware and memory Support
- Start programs faster, and quickly find the documents you use most often
- Faster, easier and safer web browsing

Microsoft Windows 7 Home Premium Price in India
- Upgrading from Windows XP/Vista then Price will be – Approx Rs. 4,500/- Indian Rupee
- And If you buy Full Retail version of Windows 7 Home Premium then it will cost you = 6,799/- Indian Rupee (INR)
Thursday, October 1, 2009
Window 7 Minimum Requirements..
Microsoft recommend the following specifications for a system running Windows 7:
* 1GHz processor (32 or 64-bit)
* 1GB of main memory
* 16GB of available disk space
* Support for DX9 graphics with 128MB of memory (for the Aero interface)
However, it is technically possible to run Windows 7 with a lower specification PC with as little as 256MB RAM, 8MB graphics memory and a 500Mhz PIII CPU [Source]. This would not be recommended, but it demonstrates the scalability of Windows 7 compared to Vista.
Changeing Windows 7 Product Key
Windows 7 allows you to change the product key (or sometimes called serial number) of the product, even once you have already fully installed Windows. This can be useful if you buy a new license and need to swap keys.
To begin, right click Computer on the start menu and select Properties:
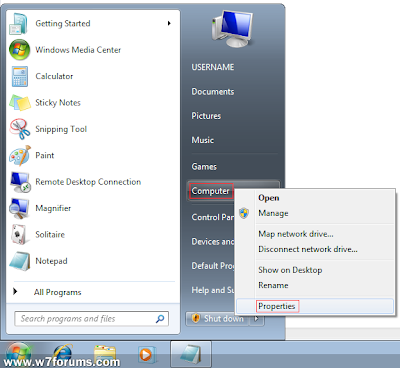
Now, scroll to the bottom of this window and click Change Product Key:
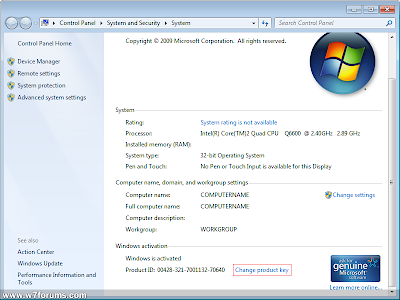
You can then enter the new key in the box provided and then click Next:
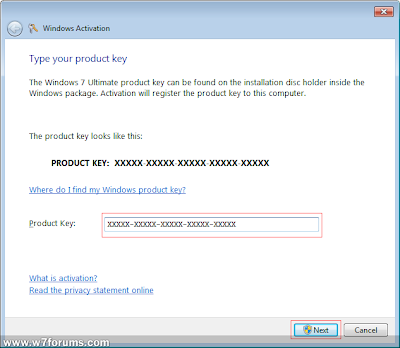
Windows will then spend a few moments checking that this key is valid:
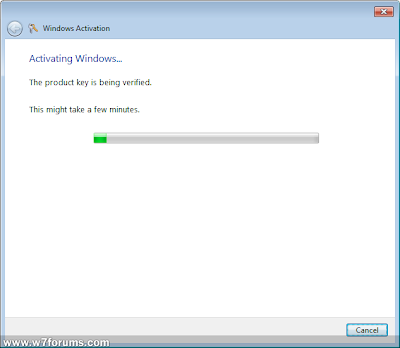
Once complete, you a confirmation is displayed to let you know that the new key has successfully been updated:

Thursday, August 28, 2008
Create 1-click shutdown for windows
This is really very easy one but very effective one. Enjoy it!
First, create a shortcut on your desktop by right-clicking on the desktop, choosing New, and then choosing Shortcut. The Create Shortcut Wizard appears. In the box asking for the location of the shortcut, type shutdown. After you create the shortcut, double-clicking on it will shut down your PC.
But you can do much more with a shutdown shortcut than merely shut down your PC. You can add any combination of several switches to do extra duty, like this:
shutdown -r -t 01 -c “Rebooting your PC”
Double-clicking on that shortcut will reboot your PC after a one-second delay and display the message “Rebooting your PC.” The shutdown command includes a variety of switches you can use to customize it. Table 1-3 lists all of them and describes their use.
I use this technique to create two shutdown shortcuts on my desktop—one for turning off my PC, and one for rebooting. Here are the ones I use:
shutdown -s -t 03 -c “Bye Bye m8!”
shutdown -r -t 03 -c “I ll be back m8 ;)!”
Switch
What it does
-s
Shuts down the PC.
-l
Logs off the current user.
-t nn
Indicates the duration of delay, in seconds, before performing the action.
-c “messagetext”
Displays a message in the System Shutdown window. A maximum of 127 characters can be used. The message must be enclosed in quotation marks.
-f
Forces any running applications to shut down.
-r
Reboots the PC.
COMPUTER BACKUPS
COMPUTER BACKUPS
by: Jack Back
COMPUTERS AND HALLOWEEN, DO THEY MIX? Computer backup is so important to your computer that to ignore it is to risk its damnation. Computers require care and feeding. They require that you attend to their needs. If you don't, then they will most surely be sent to Hell.
Halloween means Hell. What! What do you mean that Halloween means Hell? Well, if your computer is given the option of trick or treat, which will it accept? Will it accept the trick or the treat? What do you think?
Halloween is the time that computers are subject to tricks or treats. Did you know that more computers fail on Halloween than any other day of the year? That’s right. It’s true (smile). Your computer is in danger! Protect it. Do your computer backups. Back to the Hell thing. Hell you say? Yep. Well, what do you mean by Hell?
Computer hell is the place for computers without computer backup. The failure to perform hard drive backup means that you are playing Russian Roulette with your data. Data needs your protection. Failure to protect your data may cause your home or business records to be sent to Hell. Hell in this instance is for the records and files that cannot be resurrected. Resurrected you say, what does that mean?
It means that without computer backup as a source of salvation then the files can safely enjoy eternal oblivion. Oblivion you say, what does that mean? That means they are eternally lost from computer resurrection. Is there any mercy for my precious files, you ask?
Why yes there is. Would like to know what the mercy for your files is? Yes! Yes! You say. OK boys and girls listen carefully. The salvation, mercy, resurrection and redemption of your files lies in regular and consistent and persistent computer backup.
If you backup your computer consistently and persistently your files will be resurrected and saved from accidental deletion, hard drive failure and those nasty things like fire, flood, theft, earthquake, hurricanes, tornados and the like! Computer backup is the key to your data's salvation! Do your computer backups boys and girls. Milk and cookies will be served in the pantry.
Trick or treat for your computer backup? About the author:Jack Back has been a working computer consultant company owner since 1991. He started in IT in 1983. Now get your FREE 2 part guide on how to save your precious computer data from loss at the
http://www.tweakspeed.com/Computer-Backup-1.htm website.
Subscribe to:
Posts (Atom)